(
(
POE 3.5 Shadow Saboteur Starter ARC Mine Build (PC,XBOX,PS4)- High Speed, Cheap, Endgame


"The artist need not to be present to make a lasting impression."
The Saboteur focuses on improving his traps and mines with utility bonuses and additional traps and mines.
This build is the jack of all trades. It can do every map mod, boss, has decently fast clear, and is extremely cheap. Put all of these together and you have yourself an extremely powerful beginner friendly and starter build that can catapult you into end game extremely quickly and efficiently.

Quick Jump
Pros & Cons
Pros
- Start game and End game Easy
- Cheap to kill uber elder (<50c gear)
- Fast to kill uber elder (< 2 minute)
- Delve more than 1500 depth(
- Fast mapping(87%IIQ 280%IIR 1:20 map T15 Belfre or 2:30 T16 Burial Chambers)
- Magic find(87%IIQ 280%IIR and easy to mapping)
- Any map affix can be completed
- High movement speed, Run lab(MF gear 230% UP, Fight gear 250% UP)
Cons
-
- may be not suitable for some demanding players.
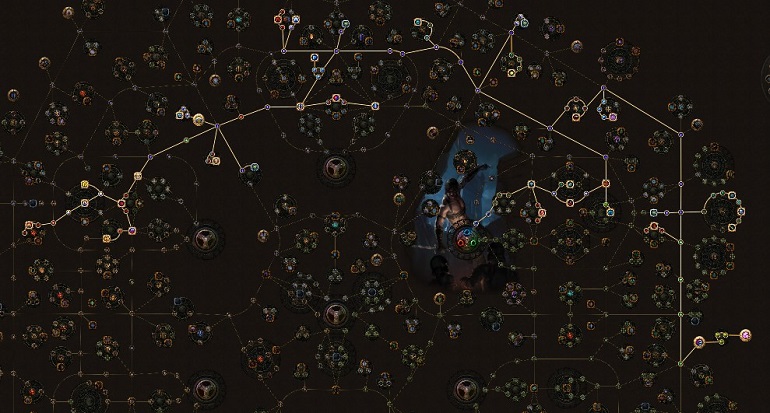
Skill Tree
Ascendancy
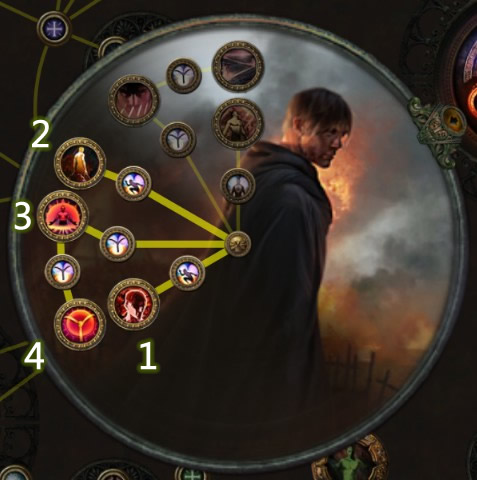
Normal Lab- Born In Shadows -> Cruel Lab - Pyromaniac -> Merciless Lab - Bomb Specialist -> Uber Lab - Demolitions Specialist
Pantheons
We take soul of lunaris and tukohama because there is no way to proc soul of arakaali easily. This gives us good physical damage mitigation which we are lacking and regen.
Passive Tree
Gems Setup
Main 6L Body
Minefield Support + Remote Mine Support + Added Cold Damage Support + Increased Critical Strikes Support + Arc + Lightning Penetration Support
If you have a call of the brotherhood you can swap out added cold damage for added lightning or controlled destruction
If you have a 4L or 5l
4L Setup --> Minefield - Remote Mine - Inc Critical Strikes - Arc
5L Setup --> MineField - Remote Mine - Inc Critical Strikes - Arc - Added Cold
Helm
Lightning Spire Trap + Lightning Penetration Support + Advanced Traps Support + Elemental Focus Support
Movement Skill/How We Proc Arcane Surge (huge damage boost)
Arcane Surge Support + Faster Casting Support + Flame Dash
Quality of Life Gems
Smoke Mine + Detonate Mines + Spell Totem Support + Increased Duration Support
When you put this spell totem down it will detonate your mines instantly if there are enemies around, so you don't have to press detonate yourself.
Smoke mine gives us a huge movement speed bonus.
Aura Gems
Clarity + Wrath
Defensive Cast When Damage Taken Setup
Cast when Damage Taken Support + Immortal Call + Phase Run + Enfeeble
Don't level up any of these gems past 2
Gear
- Demon's Horn: You want to get a shaper wand and craft it with prismatic or metallic fossils combined with serrated. Or you can do good old fashion chaos spamming.
- Siege Helmet: For the helm you would want a shaper base helm with the mod "Place an additional mine". This lets us place 4 mines instead of 3 and gives us a huge damage multiplier.
- Crypt Armour: For the body you want any Evasion or Evasion/int body base crafted with a pristine fossil for the % life mod.
- Shagreen Gloves: Gloves are pretty simple, we cover life and resistances here.
- Titan Greaves: Get boots with at least 30% movement speed, the prioritize life>resistances
- Stygian Vise
- Ahn's Heritage: we wouldn't recommend using this shield in softcore but it makes us extremely tanky with +3% to all max res and chance to block, even if that block is getting watered down by acrobatics it's still better than nothing. Also the life is nice.
- Essence worm: Essence worm is a giant dps boost with free wrath mana reservation. Normally you don't want to reserve any mana when you go Mind over Matter but this lets us bypass that. On our other ring we cover attributes and life/resistance.
- Doom Heart Onyx Amulet
- Quicksilver Flask, Diamond Flask, Basalt Flask, Mana Flask
Leveling
Basic Leveling tips
- Always try to have your resistances capped
- Check vendors for 3, 4, and 5 Link items
- Always Upgrade your flasks and pick up most of them
- Use Curses and auras as soon as you unlock them
Act 1
1. Kill Hillock and pick up explosive trap from Tarkleigh.
2. Head to Tidal Island from the coast and kill Hailrake - back to town and pick up quicksilver from Nessa.
3. Head to Mudflats, Break all eggs and go to submerged Passage. Go to town and buy frost bomb - this is one of the strongest lvling tools in the game, place it on the floor and it should one shot most packs with double wand.
4. Go down to flooded depths (If you went up a bridge you went too far) and kill the giant crab. Pick up skill book in town after and head to ledge.
5. Keep following the path until Lower prison.
6. Make sure you do the lab trial here on first floor, head to second floor and kill Brutus.
7. Back to town and pick up flame dash from Tarkleigh. If you can afford it, buy arcane surge from Nessa and link it with Flame dash, DON'T LEVEL arcane surge past lvl 3.
8. Continue until the ship graveyard and try to find the ship graveyard cave, go down here and pick up the all flame at the end of tunnel.
9. Go back to the waypoint and Fairgraves should be nearby, talk to him, kill him, and then try to find cavern of wrath.
10. There should be a waypoint as soon as you head into the cave, use this to go back to town and pick up the skill gems arc and remote mine support. Have them linked together, if you find a 3 link you can add minefield to the arc mines. If you dont have a 2L yet, I suggest you look for one from the vendor, there should be at least one. If you're unlucky you can keep leveling with explosive trap in a 1L.
11. Progress through the cave and find merveil at the end. This boss does all cold damage so if you want to be safe pick up a sapphire ring from town.
Act 2
1. Congratulations, you made it to act 2! Head right to the old fields and into the next zone - Crossroads where you will see a waypoint and 3 directions you can go.
2. I usually go to chamber of sins first which is north. Get to the second floor and complete the lab trial (the trial is always bottom left of the zone) and continue to kill Fidelitas, who is always in the top right of the zone, then go back to town
3. Pick up herald of ice and also herald of thunder if you have a transmutation to purchase it and head back to the crossroads. Head east to the broken bridge. At the end of broken bridge is the first of three bandits.
4. In the bandit quest, you can choose to save one bandit and gain stats based on what the bandit specializes in, or kill them all for 2 skill points. We want to save Alira for critical strike multiplier, mana regen, and resists. So, we kill Kraityn here.
5. Head back to town, and then back to crossroads once again but this time head south to fellshrine ruins, and then into crypt. Complete your 3rd lab trial here (Its always on the first floor) and then tp back to town.
6. We now are going to complete the West side of the map, follow the road from the riverways to Western Forest, all the way to the black gaurds and kill Arteri for the Thaumetic Emblem. Now we have to check which side the Spider boss or Alira is, they can spawn on either the left or right side.
7. If You find Alira first, ignore her, and head to the opposite side and enter the Weaver's Chambers. Go all the way to the end and kill the boss and head back to town. Pick up trap and mine damage and you can put your arcs in a 4L if you have one.
8. Next, head back to the waypoint in the riverways and head directly north of the waypoint to find the zone the wetlands. Find Oak (usually in the middle of the zone) and kill him. Head north and open up the entrance to vaal ruins and waypoint back to Western forest.
9. Talk to Alira and choose to help her, DON'T FORGET THE APEX FROM HER. Head back to the waypoint in the wetlands and enter the vaal ruins.
10. Progress to the northern forest and enter the caverns for the waypoint, then keep going to the ancient pyramid. The Vaal oversoul is at the top of the pyramid which is the final boss in the act. Try to stack up all of your mines before it spawns to kill him easier.
Act 3
1. Congrats! You made it to act 3. Head north until you see Clarissa and save her from the guard captain. DON'T FORGET TO TALK TO HER AFTER.
2. Keep following the path to town and head straight into action in the slums. Now this area is a little bit confusing but you will learn from experience. Keep exploring the area until you reach the crematorium.
3. Ignore the pleasant sounds of someone being tortured and complete the lab trial here, and continue to find Piety and kill her for Tolman's bracelet. Head back to town.
4. Talk to Clarissa, who should give you the sewer keys if you talked to her when you first entered Act 3, and head back to the slums to open the sewer gate.
5. Find the first bust before the waypoint, and the other 2 after the waypoint and head towards the marketplace.
6. Keep going until you see the waypoint, and the catacombs should be right in front of it. Go into the catacombs to complete another lab trial.
7. After you've completed it, head to town and back to the waypoint right before catacombs. Find the battlefront and the waypoint and the ribbon spool right in the middle of the zone. The docks should be located in the top right of the zone, head here and search for the thaumetic sulphite.
8. Once you have found it, head back to town and talk to Hargan for the skill point. Head back to the waypoint in the battlefront and go East until you see Solaris Temple. Keep going until you meet Lady Dialla at the end and take the rewards.
9. Head back to the sewers and burn the block to continue to the Ebony Barracks. Grab the waypoint and head north until you see Gravicius, kill him and head back to town.
10. Killing Gravicius unlocks the skill that we will be using for our single target - Lightning Spire Trap. If you have a 4L link it with Elemental Focus - Trap and Mine Damage - Added Lightning Damage. Pick up wrath and use Herald of ice and wrath as auras.
11. Head towards the lunaris temple and continue to the second floor until the end where you have to kill Piety. Note: Always be moving here or have a granite flask or you will get killed by projectiles.
12. After you have killed Piety head back to town, pick up the skill point, and head back to Ebony Barracks waypoint. From here, go west to the Imperial Gardens.
13. In the gardens, follow the path until the waypoint. Keep following the path to the library and complete Siosa's quest to unlock lightning penetration and advanced traps. They can be purchased from him after completion. Substitute these 2 for added lightning damage and elemental focus on lightning spire trap.
14. Head back to the Gardens and complete the trial (usually in top right of the zone). You now have all trials of ascendancy for the normal labyrinth. I usually get ascended sometime in the middle of act 4, but if you have leveling gear you can do it right away by going to the town in Act 3 and clicking the ascendancy plaque.
15. Head towards the Sceptre of god and continue climbing until you read the Upper Sceptre of god. Keep going and at the top of the tower you will meet the final boss of act 3, Dominus. Kill him and go through the gate to act 4.
Act 4
1. Head straight to dried lake. If you are around low level 30's by now farm here until level 34 or 35. Kill Voll at the end and pick up Deshret's Banner. Go Back to town.
2. Open the gate to the north and pick up a stone golem as a quest reward from Oyun at the top of the stairs.
3. Go toward the mines and progress to level 2. Here, we need to free the Deshret's spirit for a skill point. Find the spirit of Deshret, free it, and then talk to Tasuni in town for the skill point reward.
4. Head back to your teleport and go to the crystal veins. There should be a waypoint at the very end and 2 new zones that you can go through. I usually start with Daresso's portal.
5. Progress to Daresso, and once you kill him pick up the eyes of desire. Do the same for Kaom's dream but he will drop The eye of Fury instead.
6. Once you have both of these talk to Lady Dialla and continue into the Belly of the Beast. On the second level of the belly of the beast, kill piety and talk to her afterwards.
7. This unlocks new powerful gems for most builds but none of them help mines in any way, so we continue to the harvest.
8. Kill all 3 sub bosses and take the organs to piety, then help her kill Malachai to complete act 4.
Act 5
1. Head to the Ascent, which is the very Western point of the act 4 town, and continue until you see the resonator portal. Take it to the Slave pens.
2. Progress through the zone until you find the boss Overseer Krow, and defeat him. Head up the ladder to town and get a two stone ring as a reward, which is really nice for resistances.
3. Go to the control blocks and try to head to the bottom left corner of the map to pick up the miasmeter for a skill point. Then, progress through the zone until you see Justicar Casticus. Kill him and continue to the waypoint in the next zone.
4. You can go back to town if you'd like to pick up the flask reward. I recommend stibnite or the hallowed flask if you don't already have one. This is the point I usually get ascended, so go back to act 3 and click on the trials of ascendancy at the top of the stairs and complete the labyrinth.
5. The first nodes you should get make you extremely tanky. Get the node "born in the shadows" and go back to act 5.
6. Go back to the waypoint in Oriath Square. This is a giant zone but just hug the South wall and progress until you see the templar courts.
7.This zone has a lot of physical damage mobs, but your new ascendancy node should make you really tanky against them. Progress until you find the chamber of innocence.
8. Keep going until you see the high templar Avarius, this boss has a ton of phases and does a lot of damage. Make sure to always be moving and dodge his beam and balls, these do the most damage by far. After you defeat him talk to Banon and go to the torched courts.
9. Keep going through the courts, there isn't anything important here. Go to the ruined square and go to the top right of the map. Find the waypoint and the Ossuary, where you will find the Sign of Purity. Head back to town.
10. Pick up all the quest/skill rewards and head back to the waypoint at Ossuary. Now you need to head towards the bottom left side of the map for the Reliquary. Pick up all of Kitava's torments and go back to town for the skill reward.
11. Head back to the waypoint in the ruined square once again and this time go up and to the left until you reach the Cathedral Rooftop. At the end of this zone you will find Kitava - get ready for a hard boss fight.
12. If you get hit by any of his attacks you will most likely die, the best way to learn the fight is through experience. If he does an attack on one side of the map try to stay on the opposite side is my best advice.
Act 6
1. After you kill Kitava, your resistances are permenantly lowered by 30%. One of your best defenses in the game is having capped resistance, so try to get rare items with life>Resistance>Damage.
2. Head towards the twilight strand and fully clear the zone to unlock every gem in the game from Lily.
3. Next, head toward the Coast and this time skip the Tidal island and go straight towards the mud flats and kill the Dishonored Queen. Pick up what she drops and unlock the door in the northern part of the map to the Karui Fortress.
4. Keep going until you see Tukohama, and kill him for your first pantheon. Pantheons are a pretty minor part of this build, but they help a bit for physical damage reduction. Use the soul of tukohama for the rest of lvling.
5. Head towards the ridge, and keep going until you find the lower prison. This is almost like act 1, do the trial on the first floor, and progress up the prison until you meet Shavronne at the top of the tower.
6. After you have defeated her, continue to prisoners gate. Don't follow the path. Instead, try to find a valley and go to an open area where you should see an entrance to a boss named Abberath. Kill him for a skillpoint and head back to the waypoint after you pick up your book from town.
7. Now you can follow the path all the way until the riverways. When you see a waypoint head directly north to the wetlands, where you will find a Rhyslatha for another skill point. Head back to town for it.
8. Next, go to the very top right of the zone to find the Southern Forest, and head to the bottom right of the zone for the cavern of anger. Pick up the flag and continue through the cave.
9. The next zone is the beacon, keep going until you see two totems that you have to move by standing in the white circle while mobs attack you. Once you escort both of them you can light the torch and sail to the brine king's reef.
10. Keep going until you see the entrance to Tsoagoth, and defeat him. This boss has 4 phases, and is invulnerable for a while. Try not to go into the wall at all and try to dodge the splashes and lightning spots. He does primarily cold/lightning/physical damage.
Act 7
1. Once you sail to town just go straight into action again and head towards the broken ridge. Find the locket here and teleport back to town for a diamond flask reward. This gives us TONS of damage. Try to roll immune to bleeding on it for safety.
2. Keep going to the cross roads waypoint and head directly south towards the fellshrine ruins, and then to the crypt. There is a trial of ascendancy on the first floor here, and on the second level you will need to find Maligaro's map, which will give you a taste of what late game will be like.
3. Once you get the map go back to town and then to crossroads waypoint again, this time heading north to the chamber of sins. Find Silk in the middle and talk to him, then put the map into the device and go into the portal.
4. The mobs here do bleeding and lightning, so I highly advise you to get a bleed flask or to stop moving when you have the debuff on you. At the end of the zone find Maligaro and his minions and defeat him for the black venom.
5. Give this to Silk and he will give you a key to the next zone. Once you find the purplish locked gate to chamber of sins level 2, unlock it and go down. Now this is just like the second level in act 2. Trial in the bottom left of the zone, and a unlockable door to the next zone in the top right.
6. When you find the Ashen fields, head directly west to find Oak and his wolves and defeat them to progress to the Northern Forest.
7. This time we have to do the Dread Thicket for the skillpoint, so go all the way south and hug the left wall until you find it. Collect the fireflies and kill Gruthkuul for a skillpoint, and head back to the waypoint in Northern Forest.
8. Now head north until you find the Causeway, pick up the box and continue to the Vaal City. "Give" Yeena the fireflies and go back to town to pick up all quest rewards/skill points. Finally go back to the waypoint and go to the temple of decay for the last level of the zone.
9. At the bottom of temple of decay you should find the final spider boss, Arakaali. This boss does almost all lightning damage, and is pretty hard to dodge if it's your first time fighting her. Just try to make sure your lightning res is capped before fighting and you should be more than fine!
Act 8
1. Follow the sarn ramparts to town and prepare for one of the hardest bosses while leveling. You should be around the mid lvl 50's by now before you progress. Go to the toxic conduits in the left part of town until you find Doedre.
2. This boss is very hard, and can one shot you if you aren't careful. Whenever you get overwhelmed by the pools or curses just hit the lever and it should reset everything. Continue to do this until you can defeat her.
3. After you kill her, there should be a waypoint and 2 directions you can go. I usually go right but its mostly preference. The quay is a giant zone, you should hug the bottom left of the map until you find the Ankh of Eternity, then keep doing this pattern until you find a small side zone with Clarissa. Defeat Tolman for another skill point.
4. Head towards the end of the zone where you'll see the imperial fields. Follow these to the Solaris Temple and continue through level two of the temple to defeat Dawn. Pick up the orb and head back to town.
5. Now take the waypoint back to Doedre's Cesspool, and this time head left to the grand promenade to the bath house. There should be a lab trial (most likely near the top right or left). Complete the trial and head to the high gardens to kill Yugul at the end for a skillpoint, and head back to town.
6. Pick up all skill points and go back to the bathhouse. Now, continue towards the lunaris concourse and go north to find the Lunaris Temple. Find Dusk at the end of level two and defeat her for the moon orb.
7. Take both orbs back to the waypoint in Lunaris Concourse, but this time head south to the harbour bridge. Find the final boss of the zone in the middle of this area and then head to act 9!
Act 9
1. We are now in the famous blood aqueducts. This is where you can farm Tabula Rasa cards (The cheapest 6 link in the game). I usually stay here until low level 70's or until I complete a set of Humility's. Once you're done grinding, head towards town and go to the Descent. At low level 60's I usually complete the second level of labyrinth for my next 2 points. Pick up Pyromaniac to be even more tanky and continue leveling.
Note: Take Mind over Matter after you hit low level 70's farming blood aqueduct, this node makes you extremely tanky. When we spec into this node 30% of the damage we receive is taken from our mana before life, so take off herald of ice and wrath and link added cold damage onto your arc mines to shatter corpses (Shattering is extremely important to avoid corpse explosion 1 shot mechanics).
2. Keep going until you end up in the Vastiri Desert. Find the ruins with large pillars and defeat the mobs for the storm blade. Next, try to find the waypoint in this zone and head north to the foothills.
3. Hug the bottom right wall until you find a waypoint and enter the boiling lake. Kill the Basilisk at the end for the acid and head back to town.
4. Talk to all npcs in town and then head back to the waypoint at the foothills. Go north to the tunnel and complete the lab trial to the left of the zone, then progress to the quarry at the very top of the zone.
5. At the Quarry you should sweep the very outside part of the zone until you either find Garukhan, or the entrance to the refinery. It doesn't matter what order you do these two objectives in but they must be done.
6. After you've gotten the feather and powder, head back to town and talk to everyone. You should now have one skill point and a bottle of storm. Take the waypoint to the Vastiri desert and find the oasis at the very bottom right of the zone.
7. Progress through the zone until you find the boss, Queen of the Sands, and defeat her for the skillpoint.
8. At this point you are pretty much done with act 9. Head back to town and talk to all npcs, then head back to the quarry and progress through the rotting core to the belly of the best.
9. This will be just like act 4, you need to kill all 3 sub bosses and then you can kill the depraved Trinity and proceed to act 10.
Act 10
1. Congratulations! You are finally at the very last act :). Head to the Cathedral Rooftop and go directly left to save Banon. Then go south and enter the Ravaged Square.
2. This is a Giant zone, but it's really easy. Hug the top right wall until you see the waypoint right before the Ossuary. The final lab trial is in here, complete this and then go back to the waypoint at the entrance. Head directly south until you see the torched courts.
3. Follow this zone like you did in act 5 until you see the desecrated chambers, where you need to defeat Avarius. After you do this, head back to town and collect all quest rewards.
4. Finally, go back to the ravaged square waypoint and go the the very very very bottom left of the zone to enter the control blocks. Kill Vilenta at the end of this zone for another skill point and head back to town.
5. Now get prepared for the hardest fight yet. Make sure you have around 3.5-4k hp and capped resistances and you should be fine. Head towards the ravaged square way point one last time and progress through the canals and feeding trough until you meet kitava. Once you defeat him, gather your skill points in oriath and woot you're in the endgame!
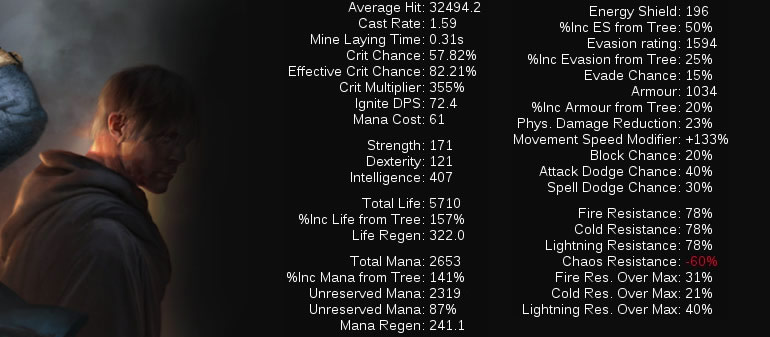
Expectations & POB
POB link: https://pastebin.com/xA38DXvn
(If you do not know how to use it, see the instructions below, otherwise please ignore)
- Download Path of Building (link: https://github.com/Openarl/PathOfBuilding)
- Copy pastebin URL.
- Launch path of building.
- Click on Import/Export.
- Click Import from Pastebin
- Paste the URL copied in step 2.
- Done!

Nov
POE 3.5 Betrayal Witch Popular Starter Builds(PC, Xbox, PS4) - Necromancer, Elementalist, Occultist
The Witch is Path of Exile's pure intelligence class, making her an unmatched master of the elemental and dark arts. She wields the power of raw magic to decimate her foes from a distance. In this guide, poecurrencybuy aims to share the most popular builds about Witch in Path Of Exile Betrayal League.

Nov
POE 3.5 Betrayal Templar Popular Starter Builds(PC, Xbox) - Inquisitor, Hierophant, Guardian
The Templar is Path of Exile's strength/intelligence hybrid class, a perfect balance of brawn and wits. He is a skillful fighter, trained in an array of weapons, from the sharpest cutlass to the heaviest two-handed mace. In this guide, poecurrencybuy aims to share the most popular builds about Templar in Path Of Exile Betrayal League.
Nov
POE 3.5 Betrayal Shadow Popular Starter Builds(PC, Xbox) - Trickster, Assassin, Saboteur
The Shadow is Path of Exile's dexterity/intelligence hybrid class. He prefers to use fast-hitting weapons such as daggers or claws to dart in and out of battle, while laying traps or remote mines and controlling the flow of combat. In this guide, poecurrencybuy aims to share the most popular builds about Shadow in Path Of Exile Betrayal League.

Nov
POE 3.5 Betrayal Scion Popular Starter Builds(PC, Xbox) - Ascendant
The daughter of corrupt nobles, the Scion was exiled to Wraeclast for killing her husband on their wedding night. She is aligned with all three core attributes - strength, dexterity and intelligence, which places her in the center of the passive skill tree. In this guide, poecurrencybuy aims to share the most popular builds about Scion in Path Of Exile Betrayal League.

Nov
POE 3.5 Betrayal Ranger Popular Starter Builds(PC, Xbox) - Raider, Pathfinder, Deadeye
The Ranger is Path of Exile's pure dexterity class, which befits her slim and graceful appearance. She is agile and fast, darting in and out of combat to deliver vicious critical strikes that often fell her enemies in a single blow. In this guide, poecurrencybuy.com aims to share the most popular builds about Ranger in Path Of Exile Betrayal League

Nov
POE 3.5 Betrayal Marauder Popular Starter Builds(PC, Xbox) - Berserker, Chieftain, Juggernaut
The Marauder is Path of Exile's pure strength class, which means that he's great at taking hits, and even better at dishing out punishment. His melee skills encompass a wide range of assault, from massive single target damage to devastating area of effect. In this guide, poecurrencybuy aims to share the most popular builds about Marauder in Path Of Exile Betrayal League.