(
(
POE3.0 | Witch Arc - SSF-friendly Mind over Matter Caster
POE3.0 | Witch Arc - SSF-friendly Mind over Matter Caster is one of the oldest guides that still gets updated to keep it strong with every major patch, and has been fairly successful over the years. Part of its success is due to the heavy focus on teaching new players about important game mechanics and -knowledge, even beyond what is relevant for this build.
if you are a beginner for path of exie you can visit Usefull Website for new path of exile players to Build
Build Videos
Main Mechanics in this build
Leveling this build
Act 1 | Act 2 | Act 3 | Act 4 | Act 5 | Act 6 | Act 7 | Act 8 | Act 9 | Act-10 | Epilogue
Passive Tree, Ascendancy & Pantheon
Whaitiri's Arc Witch - Apex of Sacrifice w/ 5L's
Whaitiri's Arc Witch - T11 Shaped Spider Forest
Whaitiri's Arc Witch - T12 Vault
Whaitiri's Arc Witch - T15 Shaped Courtyard
2. Main Mechanics in this Witch Arc build
‣ Chaining: Arc is a lightning-based spell with the ability to chain from monsters.
After chaining to two individual enemies, Arc can also chain back to the initially hit monster.
The amount of times Arc can chain depends on the gems level and can be further increased by enchantments, with a maximum of 11 chains attainable with this build.
Chaining is not represented in our tooltip, it simply shows DPS per enemy hit and is thus not always accurate. Taking all the above things into account, we can deal up to 4x the tooltip damage under perfect conditions.
‣ Shock: An elemental status ailment which increases the damage an enemy takes by up to 50% for a fixed duration, based on our lightning damage dealt.
Arc comes with an implicit 10% chance to shock, which we further amplify to assure relatively consistent shocking for maximum damage output.
‣ Semi-Crit: This has been a very crit-focused build for the longest time, but the investment needed to reach a consistently high crit chance with Arc got to a point where it's just not worth it anymore.
Instead of going all out on crit now, we just get some to proc Elemental Overload, a conditional buff which gives us a 40% more damage multiplier if we've crit in the past 8 seconds.
This allows to get good damage output with much less investment, and with that makes the build strong for endgame content at a much lower level.
‣ Curses: They are a powerful source for temporary debuffs such as letting enemies take more damage, weakening them or granting you specific things on hit/kill.
Each character can have one curse by default and raise that limit with some investment.
We use two curses - one offensive, one defensive - with the option to switch the former with a second defensive curse if needed.
Monsters can gain immunity to curses through specific monster- & mapmods, bosses have a default 60% and shaper/guardians 80% less curse effect modifier.
‣ Block: Having good defenses is extremely important in Path of Exile. Block is a powerful form of defense that lets you prevent taking any damage from a blocked hit, and comes in two ways: Chance to block attacks & Chance to block spells, both with a cap of 75%.
We get a decent amount of both through Bone Offering, originally a minion skill which applies to us through our Ascendancy, and further raise our block chance with passives and gear.
Unfortunately block won't keep us save from any damage over time and secondary damage, so we make use of another defense called..
‣ Mind over Matter: This is a Keystone which redirects 30% of damage we take to our mana pool, as long as we have sufficient mana. In order for this to be effective, we need an unreserved mana pool equal to approx. 43% of our life pool and a quick way to refill mana, which we gain through both leech and regeneration.
This section will help you while playing through the storyline and shows the recommended passive tree progression, gem setups and quest progression for each act.
If you want to explore zones or do quests not mentioned here, or even want to level with a completely different skill then do that, this section is just an aid.
General Advices during Storyline
‣ Keep your flasks updated. I recommend 2x Life Flasks, 1x Mana Flask and 2x Quicksilver Flasks, switch the Mana Flask with a Granite- or Basalt Flask of Staunching around Act 4 and one Quicksilver Flask with another Basalt Flask around Act 8. You can find a list of all flasks here.
‣ Upgrade your gear. While not as relevant in the beginning, it's important to look out for gear with solid life and resistance rolls. Ideally you want to have all three Elemental Resistances capped at 75% at the end of Act 3, only Chaos Resistance may be at whatever value.
We also don't use Staves before endgame, it's better to stick with a wand/sceptre and shield while progressing through the storyline.
Rare or Unique gear pieces are not always the best for this purpose, sometimes you're better off with Magic gear giving life and a single resistance.
You can easily craft your own gear, ideally on already 4-linked pieces you get from vendors or drops, however only use Orbs of Transmutation/Augmentation/Alteration at this point,
everything else is a huge waste!
‣ If you happen to get a 5-linked, or even 6-linked Intelligence-based gearpiece, check the damage skill setups on the gem section to know what gems to add.
‣ Great Uniques for leveling are Lifesprig, Reverberation Rod, Amplification Rod, Goldrim, Wanderlust and Tabula Rasa, but prioritize a good lifepool and capped resistances!
‣ Use Portal Scrolls and enter town to refill flasks during bossfights.
‣ Get all waypoints you can find. I mention specific waypoints you will definitely need, but generally it's recommended to get them all, since you never know if you may disconnect or need to get back to that zone for other reasons.
‣ The passive tree goals for each act are just a pointer, if you're short by 1-2 points or overleveled that's not a big deal.
ACT 1
‣ Get Arcane Surge (don't level it beyond Lv8!) from Large Chest and kill Hillock
‣ Get Freezing Pulse, link it with Arcane Surge and throw away Fireball
‣ Optionally get Lightning Tendrils if you want to use it for single target
‣ Start looking out for a 3-linked, all blue socket Wand or Sceptre
‣ Get the Coast Waypoint, kill Hailrake on Tidal Island and get Quicksilver Flask in town
‣ Enter Submerged Passage, look for Flooded Depths and kill the Dweller of the Deep
‣ Get Orb of Storms and Passive Skillpoint in town
‣ Enter Prison, get Added Lightning Damage and link it to Freezing Pulse + Arcane Surge
‣ Start looking out for 2x Sapphire Rings
‣ Complete Trial of Ascendancy in Lower Prison
‣ Kill Brutus, progress to Ship Graveyard and get the Waypoint
‣ Look for Ship Graveyard Cave, get Allflame then get Cavern of Wrath Waypoint
‣ Travel to Ship Graveyard Waypoint and kill Fairgraves
‣ Go to town to get Passive Skillpoint, Clarity, Flame Dash & Arc
‣ Replace Freezing Pulse with Arc and craft a +1 Lightning Gem Wand/Sceptre
‣ Cast Orb of Storms, then Arc to kill faster
‣ Equip Sapphire Rings and kill Merveil
ACT 2
‣ Once in town, enter the Old Fields first
‣ Start looking out for 2x Topaz Rings
‣ Optionally look for the Den, kill Great White Beast and get second Quicksilver in town
‣ Continue to Crossroads and get Waypoint
‣ Enter Chamber of Sins, complete Trial of Ascendancy on Level 2 and kill Fidelitas
‣ Get Herald of Thunder in town and use it for now
‣ Go back to Crossroads, enter Broken Bridge and kill Kraityn
‣ Back to Crossroads once more, enter Fellshrine Ruins and Crypt
‣ Complete Trial of Ascendancy in Crypt
‣ Back to town, enter Riverways and get the Waypoint
‣ Go to Western Forest, kill Alira & Captain Arteri
‣ Look for Weaver's Chambers and kill Weaver
‣ Back in town, get Faster Casting and Controlled Destruction and link to Arc
‣ Get another set of those gems when using a seperate single target spell
‣ Link Arcane Surge to Flame Dash and throw away Added Lightning Damage
‣ Enter Lioneye's Watch and get Passive Skillpoint
‣ Go back to Riverways, enter Wetlands, kill Oak and get Waypoint
‣ Get two Passive Skillpoints in town
‣ Make your way to the Ancient Pyramid, equip Topaz Rings and kill Vaal Oversoul
ACT 3
‣ Start looking out for 4-linked gear
‣ Kill the Blackguards in City of Sarn and enter town
‣ Go to Slums, enter Crematorium, finish Trial of Ascendancy and kill Piety
‣ Get Conductivity and Sewer Key in town
‣ Go back to Slums, enter Sewers, get Waypoint, find three busts and get skillpoint in town
‣ Get Marketplace Waypoint and finish Trial of Ascendancy in Catacombs
‣ Enter Battlefront, get Waypoint and kill Captain Aurelianus
‣ Go to Docks and get Thaumetic Sulphite
‣ Back to Battlefront, enter Solaris Temple and talk to Lady Dialla
‣ Destroy the Undying Blockade in Sewers
‣ Enter Ebony Barracks, get Waypoint and kill General Gravicius
‣ Optionally get Storm Burst or Ball Lightning if you want to use it for single target
‣ Enter Lunaris Temple, kill Piety and get Skillpoint in town
‣ Get Imperial Gardens Waypoint and finish Trial of Ascendancy in Hedge Maze
‣ Go to Library and finish Siosa's quest
‣ You can now buy all unlocked gems at Siosa (currency needs to be in bag!)
‣ Get Decoy Totem
‣ Link Arc with Onslaught, Controlled Destruction and Lightning Penetration
‣ Link single target spell with Controlled Destruction, Lightning Penetration and Faster Casting if Lightning Tendrils, Lesser Multiple Projectiles if Storm Burst or Slower Projectiles if Ball Lightning
‣ Link Blasphemy with Warlord's Mark and throw away Herald of Thunder
‣ Enter the Sceptre of God and kill Dominus
ACT 4
‣ Enter the Dried Lake, kill Voll and enter the Mines
‣ Free Deshret's Spirit in Mines Level 2, progress to Crystal Veins and get Waypoint
‣ Get Passive Skillpoint in town and optionally farm Dried Lake a bit
‣ Complete the first Labyrinth, you can enter it through the Sarn Encampment
‣ Read up on the Lord's Labyrinth and Izaro to get an idea what's going on
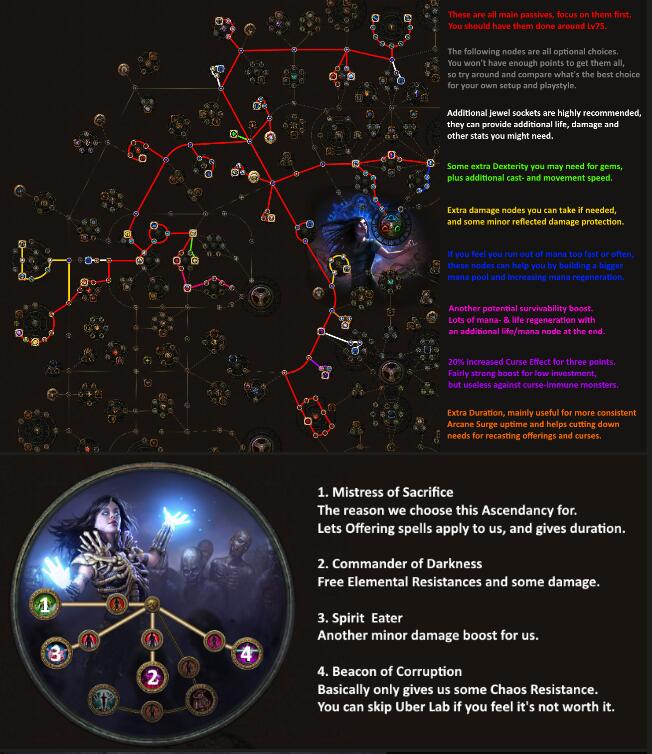
‣ After finishing the Labyrinth, ascend to Necromancer and get Mistress of Sacrifice
‣ Now get Bone Offering and Desecrate and link with Faster Casting
‣ Go back to Crystal Veins, enter Kaom's Dream and kill Kaom
‣ Now enter Daresso's Dream and kill Daresso
‣ Get Spell Echo in town
‣ Optionally get another Spell Echo if not using Storm Burst
‣ Replace Controlled Destruction with Spell Echo on Arc
‣ Replace Faster Casting with Spell Echo on Lightning Tendrils, if used
‣ Replace Controlled Destruction with Spell Echo on Ball Lightning, if used
‣ Kill Piety in Belly of the Beast, and finally Malachai in the Harvest
ACT 5
‣ Kill Overseer Krow and enter town
‣ Find the Miasmeter in Control Blocks and get Skillpoint in town
‣ Make your way to Templar Courts, kill Avarius and get a unique jewel in town
‣ Get Ruined Square Waypoint and optionally kill Utula to get Assassin's Haste in town
‣ Finish the quest in Reliquary and get Skillpoint in town
‣ Look for the Sign of Purity in Ossuary
‣ Kill Kitava on Cathedral Rooftop - this is an extremely dangerous fight!
ACT 6
‣ Clear the Twilight Strand to unlock Lilly as Skillgem Vendor
‣ Buy Cast when Damage taken and Immortal Call and link them (keep at Lv10 & Lv12!)
‣ Get to Mud Flats and kill the Dishonored Queen
‣ Enter Karui Fortress, kill Tukohama and get Skillpoint in town
‣ Finish Trial of Ascendancy in Prison and kill Shavronne
‣ Enter Prisoner's Gate, kill Abberath and get Skillpoint in town
‣ Get Riverways Waypoint
‣ Enter Wetlands, kill Puppet Mistress and get Skillpoint in town
‣ Add Enfeeble to the Blasphemy setup once you have Whispers of Doom
‣ Light the Beacon and kill the Brine King
ACT 7
‣ Find the Silver Locket in Broken Bridge and get Basalt Flask in town
‣ Enter Crossroads, get Waypoint then enter Crypt through Fellshrine Ruins
‣ Finish Trial of Ascendancy and find Maligaro's Map
‣ Go back to Crossroads and enter Chamber of Sins
‣ Kill Maligaro in Maligaro's Sanctum
‣ Finish Trial of Ascendancy in Chamber of Sins Level 2 and enter the Den
‣ Make your way to Ashen Fields and kill Greust, then get Skillpoint in town
‣ Get Northern Forest Waypoint and enter Dread Thicket
‣ Collect all Fireflies and kill Gruthkul, then get Skillpoint in town
‣ Find Kishara's Star in Causeway and get Skillpoint in town
‣ Get to the Temple of Decay and kill Arakaali
ACT 8
‣ Enter the Toxic Conduits and kill Doedre - nasty fight
‣ Go for Quay first, find Ankh of Eternity, kill Tolman and get Skillpoint in town
‣ Kill the Gemling Legionnaires in Grain Gate and get Skillpoint in town
‣ Enter Solaris Temple, get Sun Orb then enter Solaris Concourse and get Waypoint
‣ Go back to Doedre's Cesspool and go for the Grand Promenade now
‣ Get Bath House Waypoint and finish Trial of Ascendancy
‣ Enter High Gardens, kill Yugul and get Skillpoint in town
‣ Enter Lunaris Temple through Lunaris Concourse and get Moon Orb
‣ Go to Harbour Bridge and kill Solaris & Lunaris
ACT 9
‣ Good time to finish the second Labyrinth, get Commander of Darkness
‣ Find the Storm Blade in Vastiri Desert and get Skillpoint in town
‣ Get Foothills Waypoint, enter Boiling Lake and get Basilisk Acid
‣ Enter the Tunnel and finish Trial of Ascendancy
‣ Get Quarry Waypoint, enter Refinery and get Trarthan Powder
‣ Go back to Quarry and kill Garukhan and get Sekhema Feather
‣ Don't use Bone Offering for this fight, or the feather might not drop!
‣ Go to town and give the feather to either Tasuni or Irasha, get two Skillpoints
‣ Enter Belly of the Beast and kill the Depraved Trinity
ACT 10
‣ Go left on Cathedral Rooftop and kill Plaguewing
‣ Now go right and get Ravaged Square Waypoint
‣ Find the Teardrop in Reliquary and get Skillpoint in town
‣ Enter Ossuary, complete Trial of Ascendancy and get Elixir of Allure
‣ Get to Desecrated Chamber through Torched Courts and kill Avarius
‣ Enter the Canals and make your way to the final bossfight
‣ Warning: This fight is extremely difficult, i recommend to overlevel until ~Lv70
Epilogue
‣ Talk to Lani for two Skillpoints
‣ Enter Templar Laboratory and get Jungle Valley from Zana
‣ Start farming for proper gear and switch to the endgame gem setup listed in main post
‣ Once you've finished the core passive tree, go for the third Labyrinth
‣ That's it, you've reached the endgame
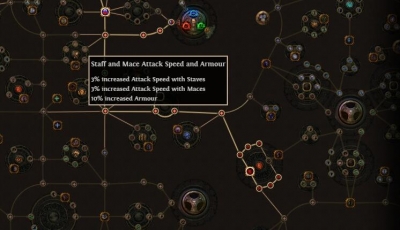
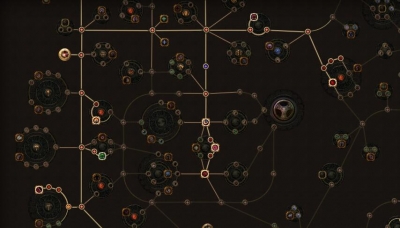
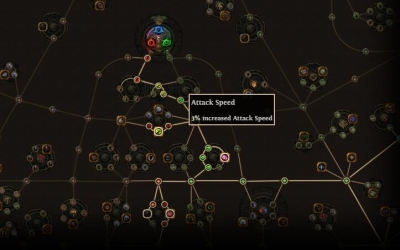
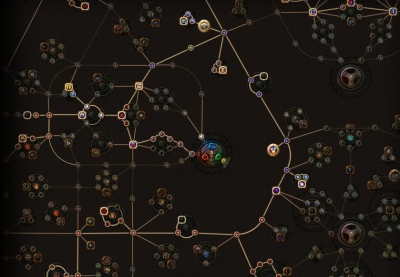
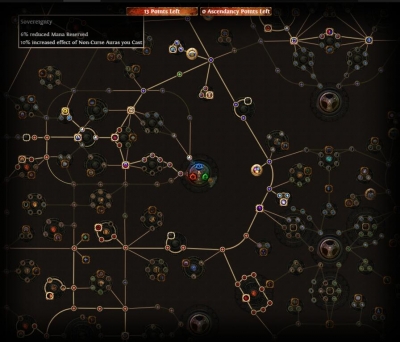
4. Passive Tree, Ascendancy & Pantheon
For those who prefer direct passive tree links
‣ Finished Base Tree
‣ With all optional choices active
‣ Path of Building setup (read Notes tab)
5. Gem Setup
Gems are listed in order of importance!
This is the endgame setup, for Act 1-10 check out the Leveling Section!

Socketed in: Staff
Arc is our clearing skill. This gem setup is laid for a good balance between raw damage, cast time and shock chance.
Spell Echo gives a large multiplier to cast speed and also doubles each cast, with the second cast costing no extra mana.
Controlled Destruction and Lightning Penetration directly increase our damage, but only the former is a visible increase in tooltip.
Lightning Penetration is a variable damage multiplier, and gets stronger the more lightning resistance an enemy has.
Life Leech heavily increases our survivability by doing what the name suggests.
Onslaught gives us 20% Cast- & Movement Speed through its buff on kill. Level it as high as your Dexterity allows.
Life Leech can be switched with Empower, which raises Arcs gem level and with that the base damage and if the result is Lv24 or higher, also gives another chain.
______________________________________________________________________

Socketed in: Chest
We have three different choices for out single-target spell, each having their pros and cons:
Ball Lightning offers great damage on a fairly good range coupled with low casting times and is my personal favorite. Downside is the relatively high Dexterity requirement for Slower Projectiles.
Storm Burst is a pseudo ranged ability and gives decent damage through overlapping explosions,
which this gem setup maximizes. Downside is its clunky playstyle - you need to channel for approximately 0.5-1s, release and repeat the whole process - and huge Dexterity requirements.
Lightning Tendrils has the maximum damage potential out of these choices, at the price of a very small range and long cast time. Not recommended for HC unless you know each bossfight!
If you test and compare all skills, note that spells get their base damage by gem level,
so if one spell is significantly lower level than the others it will give skewed results!
Empower is once again an option to swap for Life Leech if you want more damage and don't need extra leech.
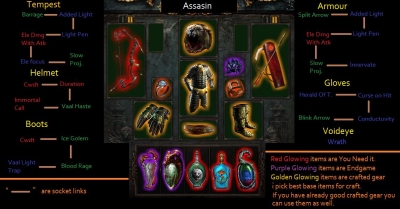
This build can work entirely with very basic rare gear - all important stats can be covered with Essence- and Mastercrafting. I've included crafting advices for that purpose.
That makes gearing very cheap, and enables a smooth progression for beginners and SSF-players.
Resistances are extremely important - each Elemental Resistance needs to be capped at
75% or you will get massive issues in maps, overcap by another 34% to be safe against curses!
______________________________________________________________________
Staves are the best choice for this build in endgame. They allow us to use more than three support gems on Arc while also being able to boost its gem level, give some block chance
(ignore the fact that mine has none) and most importantly, can be rather easily farmed through The Flora's Gift and The Dark Mage.
The main stats to look out for are +2 to Level of socketed Lightning Gems or +1 to Level of socketed Gems - just like Empower these stats raise Arcs base damage and make it easier to reach a Lv24 Arc for that extra chain. Aside from that, Spell Damage, Lightning Damage and Cast Speed are great to boost damage, while Mana Regeneration and Critical Strike Chance for Spells can add some utility.
Crafting Advice: Farm a white base through the aforementioned Divination Cards and use a couple Shrieking Essences of Spite until you get 2-3 good stats, then put a finishing touch with any useful Catarina master mod.
If you can't afford the Essences, just craft with your Orbs of Transmutation / Alteration / Augmentation until you hit +2 Lightning Gems with a useful suffix, use a Regal Orb and then add Spell Damage or Cast Speed with Catarina.
Most important thing about our chestpiece is that it must be either an Energy Shield or Hybrid-Energy Shield base, otherwise getting the right colours will become a nightmare.
Chestpieces can roll the highest Life out of all gear, try to get atleast 80 Life with maybe one or two Resistances.
Crafting Advice: Farm or buy Emperor of Purity cards and use a couple Shrieking Essences of Greed, then refine with Haku's crafting bench.
Helmet, Gloves and Boots all need 70+ Life and Resistance rolls, other than that only thing to look out for is 20%+ Movement Speed on boots and no Evasion bases for easier chroming.
For min-maxing, Fingerless Silk Gloves provide a small spell damage boost through their implicit.
Crafting Advice: Usually crafting isn't needed here.
Leather Belts are the best base to maximize our lifepool, again with 70+ Life and some Resistance. Belts are also the only gear that can roll Reduced Flask Charges used, Increased Flask Effect Duration and Increased Flask Charges gained, which are all very powerful mods.
If there is an open prefix, you can also add Movement Speed with Tora.
Crafting Advice: Another slot you probably won't need to craft, but if you do then get a good itemlevel Leather Belt and spam Essences for whatever Resistance you need.
Amulets are an extremely versatile slot with lots of potentially good mods for this build.
It starts with the base - i recommend either any Dexterity base or a Blue Pearl Amulet.
Prefixes are pretty limited, 60+ Life is mandatory, Spell Damage and Mana are optional.
Suffixes offer Cast Speed, Lightning Damage, Mana Regeneration Rate, Critical Strike Chance,
Dexterity, All Attributes and Resistances to choose from, although i recommend to cap Resistances through other slots.
Crafting Advice: Get one of the mentioned bases with an appropriate itemlevel and spam some Essences of Wrath until you get atleast a good liferoll, then add Mana or Mana Regeneration Rate with Elreon.
Rings offer a similar pool of mods as amulets, minus the Spell Damage and Critical Strike Chance. Opal Rings are the best base here, but might be a little expensive. You may also need an Unset Ring to fit in all gems.
Crafting Advice: Pick up white rings in yellow/red maps and alch them. If the result is bad, keep it either for chaos recipe or to vendor 5 of same base for an unidentified rare ring.
If you can get your hands on an Opal Ring, spam some Essences of Wrath until you get something useful with a high liferoll.
This build requires a very active hit & run playstyle. Most important thing is proper timing:
learn the duration of your skills, buffs and flasks and try to get a feel for when to update them.
It can be overwhelming at first, but gets pretty easy once you're used to it.
You can optionally cut down most of the casting with Kitava's Thirst.
Drop Orb of Storms at enemies, then kill them with Arc and move with Flame Dash to the next pack. Keep your Quicksilver for longer distances, or if Flame Dash is out of charges.
Our offering skills have a pretty long duration and don't need to be onscreen to be active - as long as the buff icon is there, you get the bonus.
Bossfights deserve their name again since Patch 3.0 - if you've played the game before, expect them to take longer due to a significant boss life buff. My recommended strategy is cast Desecrate 3x before engaging the boss, get Bone Offering up, cast Decoy Totem near the boss, Flame Dash to start the fight, drop Orb of Storms then burst them down and refresh buffs if needed.
Here's a list with all map bosses, their approximate difficulty and other, possibly outdated info.
Mapmods
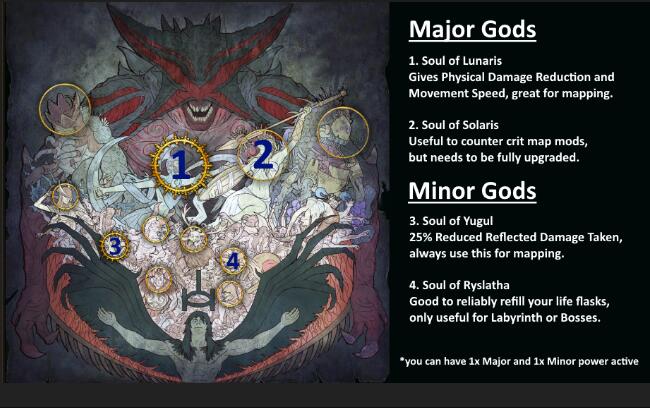
‣ Monsters reflect x% Elemental Damage: Activate Yugul's Pantheon power, equip Sibyl's Lament, use Life Leech on your damage setups, use Bone Offering and keep up your Topaz Flask. It's still risky sometimes.
‣ Monsters are Hexproof: Use Life Leech on your damage setups and equip a Hybrid- or Mana Flask.
‣ Cannot leech Life & Mana from Monsters: Technically possible, but not worth the risk.
Sep
POE3.0 Build Very Budget 854K DMG For All Class
POE3.0 Build Very Budget 854K DMG For All Class lose +1 power charge from bandit reward try look +1 power charge corruption on the bow , not essential but its nice to have it.Or Instead Of Power Charge if you manage find "Culling Strike" you can always turn into Alternative Version if Assasin Bothers you.
Sep
POE3.0 Build | Templar Spells Crit Ball Lightning build
POE3.0 Build | Templar Spells Crit Ball Lightning build to easy farm endgame bosses, like the guardians and Shaper, it got some serious clearspeed aswell tho. It is life based (with a lower ES pool) and reaches 5-6k life & 1-2k ES with ordinary gear. T
Aug
Path of Exile 3.0 Bleed Flurry Brutality Build for Duelist
poe3-0-bleed-flurry-brutality-build-for-duelist(Fast mapping + Uber Lab farming + Hall of the Grandmasters + all T16 + Shaper + Uber Atziri (HSC)) This build guide is an active and ongoing collaboration between Little_MessPM and Bladewing_M; LMPM is natively a Russian language speaker so he asked me to create a guide for his 100% original build.
Aug
Path of Exile 3.0 Duelist Build Retch - SLArcher
Finally Vessel of Vinktar provides a huge lifeleech-amount based on your lightning damage (30% base for leg. version and 20% for the new one), which is already showing the direction they build has to take: Getting as much lightning damage as possible (more later at following points).
Aug
Max Block Scorching Path of exile 3.0 Ray Necromancer Build
Max Block Scorching Path of exile 3.0 Ray Necromancer Build pros : - can do All mapmods except "less armour / block reduction" - CAN'T DIE if there are "many hits" (Storm Herald, Ball Lightning, Breaches,Daresso Swords.................) - can do Hall of the Grandmaster - Afk tanking Chimera (haven't tried other Guardians because of Atlas customizing)
Aug
Righteous Fire Mind Over Matter for poe 3.0 Starter Build
Path of Exile 3.0 Fall of Oriath Harbinger League starter build guide - Scorching Ray Inquisitor with Righteous Fire and Mind Over Matter served with a side of Aoili dipping sauce on a bed of of couscous. No gear requirements to get started, can comfortably farm the money it needs to buy a Rise of the Phoenix to go RF (or to invest in another build). HC viable (200%+ life with Mind Over Matter) and pretty fast n fun to play.